
|
May 23
Well. IDS expo/fair is one week 6 days away. My project is on photography if you didn't know. My project is related to Jujhar's, Amrit's, and Kirt's. We are working together and helping each other out. Kirt and I are taking photos and videos, Amrit's making music, and Jujhar is going to take all of these elements and make them into a video showcasing all of our skills. I have a few choice photos at this time that I am proud and ready to present, however I am still lacking a sufficient amount for my set standard. I really need to work hard on the project this weekend. Wish me luck. And remember, come see everyones projects on June 5th!
0 Comments
A few classes ago we were tasked with making a simple beat in a program called Audio Sauna (audiosauna.com) and I transposed a good part of All Star by Smash mouth. Have a listen. Logo DesignMy topic I chose for my independent study was Logo Design. I chose this topic for learning purposes, as I am not the best at graphic design or photoshop etc. My original objective was to make a simple logo to go at the top of my blog. I then decided to make a portion of my project learning how to use a Wacom drawing tablet to do so.  My very first idea in my head was to do a cartoon like drawing of myself. 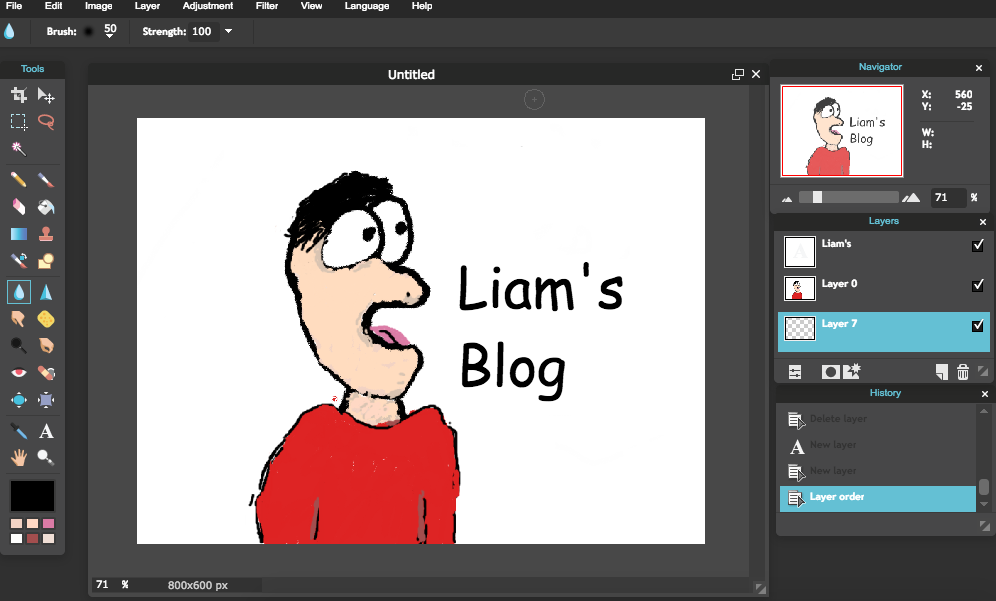 I can't say that I was happy with my results, but I know that I'm not the best at drawing either. At that point, I wasn't satisfied, so I scrapped that idea. Next, I had to conjure a new creative idea. At that point, I tried making a double exposure.  I wasn't satisfied with the results of this either, maybe if I tried this particular type of photo more I would get a better result. But as of then, I wanted to think a bit simpler. Simply just my face on a transparent background.  Now I bet you're wondering, why am I doing all of this in Pixlr, when Photoshop is the obvious choice? Well, my reason for that is if I used Pixlr, I could learn how to deeper use the simpler features. Not only that, but if my friends needed help with something and didn't have access to Photoshop, I would be able to help them with slightly more complicated tasks. Now, I was finally satisfied with my blog icon.  Now it stays there, watching you as you browse my blog page. Look in the top left right now and you'll see it. But that wasn't the end of my project. I still wanted a new Gmail profile picture. I wanted to experiment with something. I chose making a person in an environment in a photo and being able to erase parts of their body. To do this I simply put my phone on a tripod, took one photo of the environment without me in it, then one with me in it. I pasted the layer of the photo without me first, then the one with me on top. Then all I had to do was simply use the erase tool on any parts of me I pleased on that layer.
I was happy with the results of it. What did I learn? I learned how to do basic double exposures, make a clear background of an image, and erase parts of photos. Was I happy with my results? Fairly; I was satisfied with my results, but I feel that I could have done better. And that puts a conclusion to my project post. Thank you.  In one of our classes, we learned how internet works. We learned about how information travels from the internet to your computer after your request for information. We watched this video. We learned about packet switching, and how the request for information goes from your computer to the internet, and sends the information back to your computer. This personally helped me to understand the internet a lot more.
We were assigned to make a computer for an imaginary client. (bulid a computer as in collect parts online) These were the client's requirements.
-Under $1000 -2 hours gaming daily -school work At that point, we had to figure out what kinds of questions we were to ask the client. -Preferred OS -Any preferences as to how much money is contributed into certain parts -etc. We were to then select our parts. I personally used a website called pc part picker, as it made picking parts to put a computer together very easily. Not only did it list the parts you may have been missing, but it also showed you total price, and gave you a stats list afterwards. Below is that stat list of all the parts I chose and why. Client: -Under $1000 -Homework -2 Hours Gaming Parts: PCPartPicker part list: https://ca.pcpartpicker.com/list/kkzJNN Price breakdown by merchant: https://ca.pcpartpicker.com/list/kkzJNN/by_merchant/ CPU: Intel Core i5-4460 3.2GHz Quad-Core Processor ($236.98 @ DirectCanada) Because it is the best CPU you can get for the price point. Motherboard: ASRock Z97 Anniversary ATX LGA1150 ($69.97 @ NCIX) Because it is very reliable and good for its price point. Memory: G.Skill Ripjaws X Series 8GB (2 x 4GB) DDR3-2133 Memory ($74.99 @ Newegg Canada) Because 8 gb is a fair amount of memory, and two sticks looks cooler than one. Storage: Western Digital Caviar Blue 1TB 3.5" 7200RPM Hard Drive ($62.95 @ Vuugo) Because it has a lot of storage and is at a reasonable price point. Video Card: PNY GeForce GTX 960 2GB XLR8 Video Card ($271.84 @ Amazon Canada) Because it is good video card that will make the gaming experience better. Case: NZXT S340 (White) ATX Mid Tower Case ($84.98 @ NCIX) Because it is a good looking case that has all the basic features. Power Supply: EVGA SuperNOVA NEX 650W 80+ Gold Certified Fully-Modular ATX Power Supply ($50.17 @ Amazon Canada) Because it is a reliable power supply. Case Fan (x2): NZXT FZ-120mm LED 59.1 CFM 120mm Fan ($4.99 @ Memory Express) Because they are very price savvy and come with two. Monitor: Acer G226HQLBbd 21.5" 1920x1080 60Hz Monitor ($109.99 @ NCIX) Because a 1080p/60Hz monitor for the price is good. Keyboard: Cooler Master CM Storm Devastator Gaming Bundle Wired Gaming Keyboard w/Optical Mouse ($32.54 @ DirectCanada) Because it is a very good keyboard for the price, and also comes with a mouse. OS: LINUX (Free) Because it is a good alternative to Windows 10 that will save you $150. Total: $1004.39 Prices include shipping, taxes, and discounts when available It is slightly above budget, but I don’t think that $4 is really much of a deal breaker. That is my computer parts list, I believe it is pretty good. I hope that I did a good job. Another of our assignments was to 3D model something ourselves, and 3-D Print it. Sadly though, I did not get the chance to as when I wanted to the printer was always occupied. For my design, I made a keychain with my name on it. It was a very basic design, and I didn't get my hopes too high on making some amazing design, as I am not the best at 3-D modelling. Anyways, here I will show a screenshot of my design. In the off chance I get to print later on, I will add a photo of the final product printed out. As of now, here is my design.  I used Tinker Cad to design this keychain. I could likely improve it, but this is what I have. Tinker Cad was a very simple and easy to use program that I liked. Perhaps in the future I will try some other 3-D modelling software, such as Makerbot, or Blender etc.
In a class, we were shown how to to basic coding in html. We learned simple stuff, like changing background and text colour, inserting images, etc. Then, with our basic knowledge our assignment was to make a webpage in html using this outline. This Is Me. 3 pics I made
Check Out Some of My work!  My Top 3 Careers: -****** -****** -****** With minor difficulty and some tinkering, I finally got my webpage to work. Below is an image of the code, and a screenshot of the page. Go check it out! I left on it 3 photos of mine and a video I filmed during science class.     In class a little while back, we took a first look at some different computer parts.
we learned to identify the majority of the parts, but I myself am still not very weary of the more specific parts. I can name only the major parts, but I hope to learn more along the way.
In IT class, one of our assignments was to print/cut a sticker using the Roland printer/cutter. Here are some photos of the Palace Skateboards logos I printed. I printed 3, (6 if you use the box part) because the stickers that the company already make are always sold out, meaning that this was my opportunity to take advantage of the printer. I put one sticker on my laptop, one on my skateboard, and gave one to my brother.
I tried using the outside box first, as I thought it would be easier to apply, but that was not the case. As I applied it, it bent slightly. Then I used the letters and discovered that getting the spacing right wasn't too difficult, and that it looked better anyways.
All in all, I think the stickers turned out pretty nice, and i'm quite happy with how they look.
I don't have much to say, so this post will be brief. I made a video from the Sun Peaks trip, and thought I would share it. I hope you guys liked that video. Anyways, I'll talk a bit more about the trip itself. It was my first trip to Sun Peaks. It was very fun. The lessons helped me progress my skiing skills far past what I had expected. Some of my classmates may disagree with me, but I quite enjoyed cross country skiing, trying it for the time. I also enjoyed snowshoeing. Although it reached temperatures of up to -33 degrees, it was still an amazing experience. (if you dressed well) After having gone on the trip, I can see how disappointing it is that the trip is likely to be discontinued. I don't have much more to say, so thanks for reading and watching!
|
Archives
May 2017
Categories |


 RSS Feed
